viernes, 29 de abril de 2011

The printer could not be tamed...


   Here I put in a few lines my odyssey with Oki C3200 laser printer (without LCD, European version) in search of supplies savings. First of all I recommend viewing a documentary about planned obsolescence.
   Why this printer? because it´s  the best I have and it cost me very little. Seems many people have it and it costs very little compared to benefits. In the end you find out why ... accessories and consumables (including the fuser and belt) cost a fortune. For people with mechanic skills don´t mind filling a toner cartridge so we can lower the costs "recommended" by the manufacturer.


NOTE: This information is provided for educational purposes only, so I am not responsible of any damage that may result.


   Now I will explain how to reset the counters of the printer after refilling any toner cartridge. This applies to all types of cartridges (normal or starter). It has been really impossible to find anything on the Internet for this type of printer. The only thing I could find was refilling cartridges and replace image drum fuse, the other guides and tips are related to the renewed version C3200N (with LCD).


   Come to:
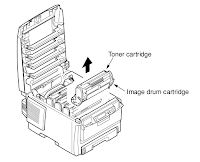

1. Turn off the printer and open the top cover


2. Extract the black cartridge with image drum.


3. Look carefully inside the printer to the right you will see 2 pins that stick out (is to blow the fuse of the cartridge when new). Connect a wire between them so that they are short and thus cause a boot failure.


4. Put the black cartridge and close the lid


5. Turn on the printer and wait a moment


6. When the two orange LEDs on the right blink press he panel keys ("On line" and "Cancel") and keep them well over 10 seconds.


7. When the green LED light and 2 orange from left turn on without blinking release both keys and press the "Cancel" by holding more than 5 seconds.


8. Click "On line" once and when the order of the LEDs is changed again, press "Cancel" more than 5 seconds (you have to do it twice because there are 3 menus in total and fast)


9. When finished, the green LED light and 2 orange from right are blinking, turn off the printer and open the top cover.


10. Removed the black cartridge and remove the short wire that we did at first.


11. Put the cartridge into place and close the lid.


12. Turn the printer on and wait to do their stuff. When the green LED stops flashing press "On line" between 3-4 seconds to print the system check.


  I repeat that the method is only tested on the C3200 model with no LCD screen. I hope you like. In the following guide will tell you as a "freeze" other consumables counters (the fuser and the belt). Until next time.

martes, 26 de abril de 2011

La impresora que no se podía domar...

   Aquí os pongo en pocas lineas mi odisea con la impresora láser Oki C3200, sin LCD (versión europea), en búsqueda de ahorro con los consumibles. Antes de nada os recomiendo un documental buenísimo sobre obsolescencia programada que viene a caso con el tema.
   ¿ Porque esta impresora ? pos porque es la mejor que tengo y me costo poquísimo. Parece que la tiene mucha gente y vale muy poco en comparación con las prestaciones que tiene.  A cabo de una temporada te enteras porque... los accesorios y consumibles (incluso el fusor y la cinta) cuestan una pasta. Para la gente que somos un poco manitas rellenar un cartucho de toner es hasta divertido y así bajamos un poco bastante los costes "recomendados" por el fabricante.

ATENCIÓN: Esta información la proporciono sólo con fines educativos, así que no me hago responsable del los daños que se pudieran ocasionar. 

   A continuación os explico como reiniciar los contadores de la impresora después de rellenar cualquier cartucho con toner. Esto vale para todos los tipos de cartuchos (normal o starter). A mi me ha sido prácticamente imposible encontrar en internet como de hacerlo para este tipo de impresora. Lo único que he podido encontrar fue rellenar los cartuchos y cambiar el fusible del tambor de imagen, el resto de guías y trucos están relacionados con la versión renovada C3200N (con pantalla LCD).

   Vamos a ello:

1. Apaga la impresora y abre la tapa superior

2. Extrae el cartucho negro por completo

3. Fíjate bien en el interior de la impresora a la derecha veras 2 patillas que sobresalen (son para fundir el fusible del cartucho cuando esta nuevo). Conecta un hilo metálico entre ellas para que se queden en corto y así provocar un error de arranque.

4. Vuelve a meter el cartucho negro y cierra la tapa

5. Enciende la impresora y espera unos instantes

6. Cuando empiecen a parpadear los dos leds naranja de la derecha aprieta las teclas del panel ("On line" y "Cancel") y mantenlas así mas de 10 segundos.

7. Cuando se encienden el led verde y los 2 naranja de la izquierda sin parpadear suelta las dos teclas y pulsa la tecla "Cancel" manteniendo apretado mas de 5 segundos.

8. Pulsa "On line" una vez y cuando el orden de los leds se cambia vuelve apretar "Cancel" mas de 5 segundos ( esto hay que hacerlo dos veces porque son 3 menús en total y rápido para que no se salga al principio)

9. Al finalizar, se encienden el led verde y los 2 naranja de la derecha parpadeando, apaga la impresora y abre la tapa superior.

10. Extrae el cartucho negro y retira el puente que hemos hecho al principio.

11. Coloca el cartucho en su sitio y cierra la tapa.

12. Enciende la impresora y espera que haga sus cosillas. Cuando el led verde se queda fijo pulsa "On line" entre 3-4 segundos para imprimir la comprobación del sistema.


  Repito que el método solo esta probado en el modelo c3200 sin pantalla LCD. Espero que os sirva. En la siguiente guía os contare como "congelar" contadores de los otros consumibles (el fusor y la cinta). Hasta la próxima.